
# 提供OAuth2服务供外部系统集成
# OAuth2集成原理
AFCenter可作为OAuth2授权码模式的认证服务进行使用,基本的流程如下:
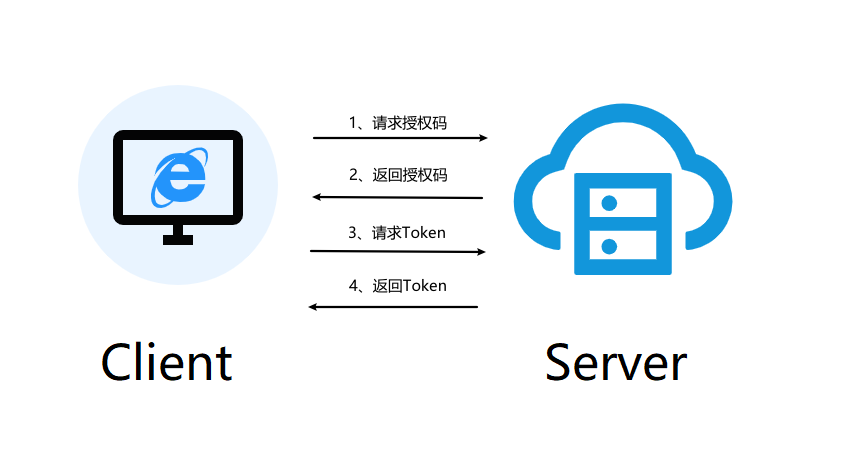
AFCenter中提供了授权码模式的实现,以RESTFull的方式提供对应接口,方便业务系统灵活的使用各种技术方案去集成。(提供的后端demo中使用了Spring security sso模式)
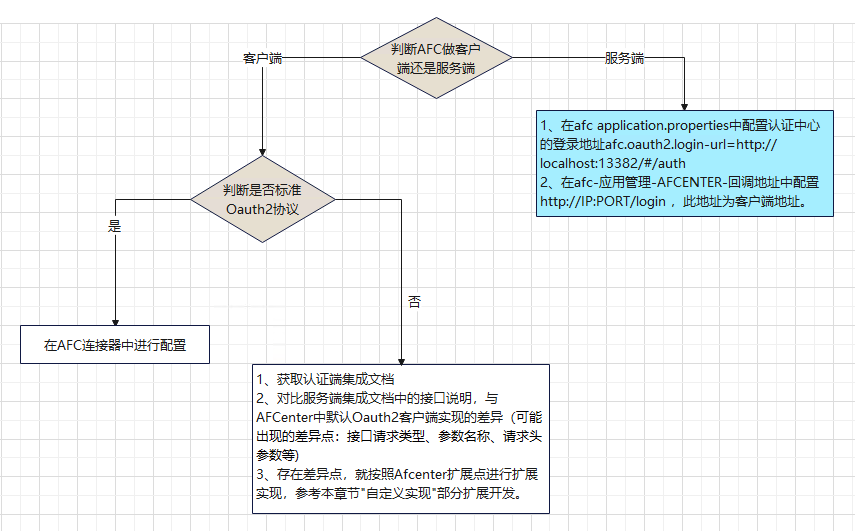
Oauth2认证集成准备流程如下如,本文讲解AFCenter做服务端,配置参考下图蓝色部分。
# 配置说明
1、afcenter的properties中需要配置认证中心的登录地址
afc.oauth2.login-url=http://localhost:13382/#/auth //其中的ip和端口只需要更改成前端页面所在ip和端口即可
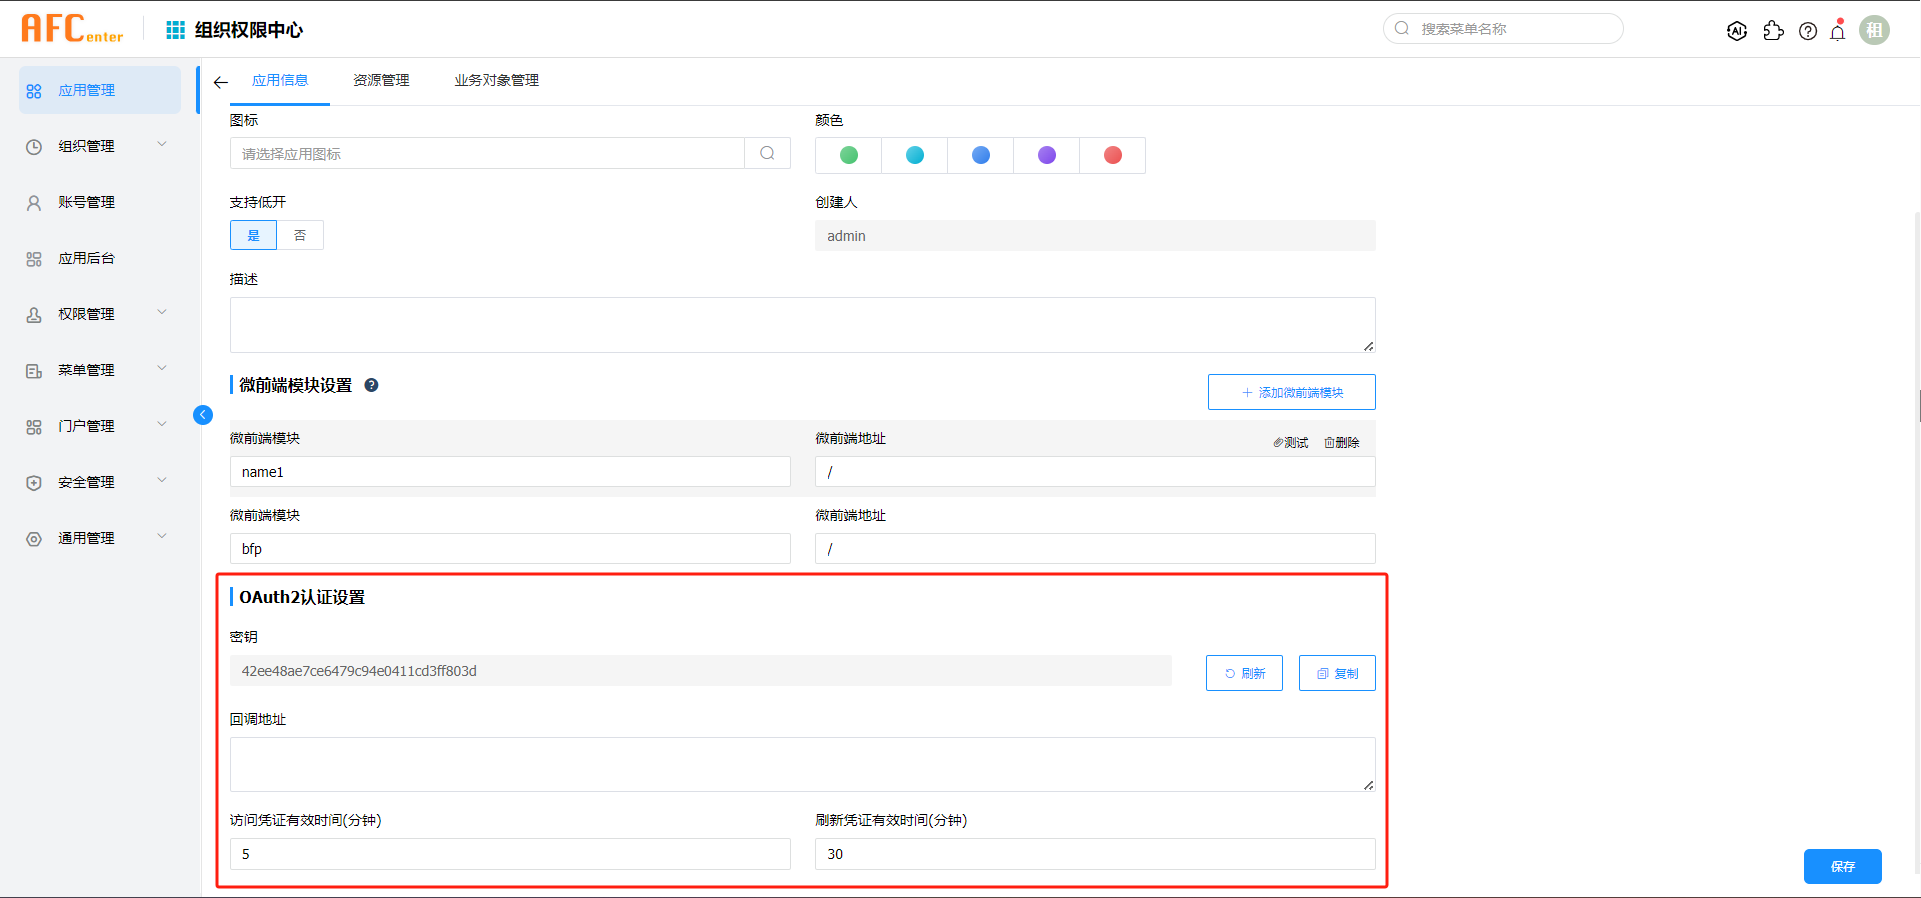
2、在afcenter的应用管理-应用信息一栏中可以获取密钥以及配置回调地址和访问凭证时间等信息。回调地址只支持配置一个。
# 接口说明
后续接口没有特殊说明一律使用GET请求方式,同时建议除了获取授权码接口需要客户端调用外,其他接口都是后端进行调用。
获取授权码
根据以下格式构建url,引导用户访问(注意复制时删减掉多余空格或者换行符)
    http://127.0.0.1:8001/api/afc/oauth2/authorize    //8001为afc后端端口
        ?response_type=code
        &client_id={value}
        &redirect_uri={value}
        &scope={value}
        $state={value}
参数详解:
| 参数 | 是否必填 | 说明 |
|---|---|---|
| response_type | 是 | 返回类型,这里请填写:code |
| client_id | 是 | 应用id(应用code/租户Id,eg:xxx/123) |
| redirect_uri | 是 | 用户确认授权后,重定向的url地址 |
| scope | 否 | 固定是all |
| state | 否 | 随机值,此参数会在重定向时追加到url末尾,不填不追加 |
注:
- client_id:应用code从afc_application中查找获取,租户id从afc_tenant中查找获取 redirect_uri是认证服务需要携带授权码回调客户端的地址,平台配置的回调地址就是redirect_uri
- 如果用户在AFCenter Server端(认证中心)尚未登录,会被转发到登录视图
- 有没有scope参数默认都是静默授权all
用户登陆成功之后,会重新自动携带之前的参数请求授权接口,认证成功后,会被重定向到redirect_url,并追加code参数与state参数,如下:
redirect_uri?code={code}$state={state}
Code授权码具有以下特点:
- 每次授权产生的Code码都不一样
- Code码用完即废,不能二次使用
- 一个Code码有效期为5分钟,超时自动作废
- 每次授权产生的新Code码,会导致旧Code码立即作废,即使旧Code码未使用
根据授权码获取Access-Token
获得Code码后,可以通过以下接口,获取用户的Access-Token、Refresh_Token等关键信息
    http://127.0.0.1:8001/api/afc/oauth2/token
        ?grant_type=authorization_code
        &client_id={value}
        &client_secret={value}
        &code={value}
参数详解:
| 参数 | 是否必填 | 说明 |
|---|---|---|
| grant_type | 是 | 授权类型,这里请填写:authorization_code |
| client_id | 是 | 应用id(应用code/租户Id,eg:xxx/123) |
| client_secret | 是 | 应用秘钥 |
| code | 是 | 步骤1.1中获取到的授权码 |
接口返回示例:
    {
            "access_token": "7Ngo1Igg6rieWwAmWMe4cxT7j8o46mjyuabuwLETuAoN6JpPzPO2i3PVpEVJ",     // Access-Token值
            "refresh_token": "ZMG7QbuCVtCIn1FAJuDbgEjsoXt5Kqzii9zsPeyahAmoir893ARA4rbmeR66",    // Refresh-Token值
            "expires_in": 7199,                 // Access-Token剩余有效期,单位毫秒
            "refresh_expires_in": 2591999,      // Refresh-Token剩余有效期,单位毫秒
            "client_id": "1001",                // 应用id
            "scope": "all",                // 此令牌包含的权限
            "token_type": "bearer" //令牌类型
    }
根据Refresh-Token刷新Access-Token
Access-Token的有效期较短,如果每次过期都需要重新认证授权的话,会比较影响用户体验,因此可以通过在后台通过Refresh-Token刷新Access-Token,注意需要客户端自己实现本地刷新Access-Token的逻辑
    http://127.0.0.1:8001/api/afc/oauth2/token
        ?grant_type=refresh_token
        &client_id={value}
        &client_secret={value}
        &refresh_token={value}
参数详解:
| 参数 | 是否必填 | 说明 |
|---|---|---|
| grant_type | 是 | 授权类型,这里请填写:refresh_token |
| client_id | 是 | 应用id(应用code/租户Id,eg:xxx/123) |
| client_secret | 是 | 应用秘钥 |
| refresh_token | 是 | 步骤2中获取到的Refresh-Token值 |
接口返回同第2步。
注销Access-Token
SSO客户端在单点退出的同时,需要在认证服务器端也进行单点退出
    http://127.0.0.1:8001/api/afc/oauth2/revoke
        ?client_id={value}
        &client_secret={value}
        &access_token={value}
参数详解:
| 参数 | 是否必填 | 说明 |
|---|---|---|
| client_id | 是 | 应用id(应用code/租户Id,eg:xxx/123) |
| client_secret | 是 | 应用秘钥 |
| access_token | 是 | 步骤2中获取到的Access-Token值 |
返回值说明:
    {
        "code":200,
        "msg":"ok"
    }
根据Access-Token获取相应用户的账号信息
    http://127.0.0.1:8001/api/afc/oauth2/user-info
    请求头设置Authorization:accessToken(认证成功后获取到的accessToken)
返回值样例:
    {
        "username":"sss", //登录账号
        "tenantId":"xxx", //所属租户Id
        "employeeId":"aaa" //登录账号绑定的员工Id
    }
密码模式获取AccessToken
根据用户名密码获取AccessToken,其中密码需要进行加密处理,加密逻辑和afc登录的加密模式一致
http:/api/afc/oauth2/token
?grant_type=password
&client_id={value}
&client_secret={value}
&username={value}
&password={value}
| 参数 | 是否必填 | 说明 |
|---|---|---|
| client_id | 是 | 应用id(应用code/租户Id,eg:xxx/123) |
| client_secret | 是 | 应用秘钥 |
| username | 是 | 登录用户用户名 |
| password | 是 | 登录用户密码,需要使用UrlEncode进行编码后传输 |
密码模式AccessToken使用说明:
密码模式登陆时,需要对密码使用AFC的加密方式(RSA\SM2)进行加密,这部分可以参考前端登录逻辑,加密后的密文需要再进行UrlEncode编码,然后再传输。
应用请求afc接口时,可在url参数或者请求头参数中携带accessToken来访问,具体示例如下:
参数名 示例 说明 Sso-Authorization-Token http://10.15.15.151:14082/afc/api/afc/station/unread?Sso-Authorization-Token=123456 url上携带参数 http://10.15.15.151:14082/afc/api/afc/station/unread
Content-Type: application/json
Sso-Authorization-Token: 123456请求头Header中增加参数 如果返回http请求结果状态是401则代表accessToken失效,可用refreshToken去刷新accessToken,如果刷新返回的状态码是100331则表示refreshToken过期,需要重新进行密码模式授权
# 基于Spring security sso 的客户端简单认证demo示例说明:
- pom依赖说明
    <?xml version="1.0" encoding="UTF-8"?>
    <project xmlns="http://maven.apache.org/POM/4.0.0" xmlns:xsi="http://www.w3.org/2001/XMLSchema-instance"
             xsi:schemaLocation="http://maven.apache.org/POM/4.0.0 https://maven.apache.org/xsd/maven-4.0.0.xsd">
        <modelVersion>4.0.0</modelVersion>
        <parent>
            <groupId>org.springframework.boot</groupId>
            <artifactId>spring-boot-starter-parent</artifactId>
            <version>2.2.6.RELEASE</version>
            <relativePath/> <!-- lookup parent from repository -->
        </parent>
        <groupId>com.primeton</groupId>
        <artifactId>client2</artifactId>
        <version>0.0.1-SNAPSHOT</version>
        <name>client2</name>
        <description>Demo project for Spring Boot</description>

        <properties>
            <java.version>1.8</java.version>
            <spring-cloud.version>Hoxton.SR3</spring-cloud.version>
        </properties>

        <dependencies>
            <dependency>
                <groupId>org.springframework.boot</groupId>
                <artifactId>spring-boot-starter-web</artifactId>
            </dependency>
            <dependency>
                <groupId>org.springframework.cloud</groupId>
                <artifactId>spring-cloud-starter-oauth2</artifactId>
            </dependency>
            <dependency>
                <groupId>org.springframework.cloud</groupId>
                <artifactId>spring-cloud-starter-security</artifactId>
            </dependency>

            <dependency>
                <groupId>org.springframework.boot</groupId>
                <artifactId>spring-boot-starter-test</artifactId>
                <scope>test</scope>
                <exclusions>
                    <exclusion>
                        <groupId>org.junit.vintage</groupId>
                        <artifactId>junit-vintage-engine</artifactId>
                    </exclusion>
                </exclusions>
            </dependency>
        </dependencies>

        <dependencyManagement>
            <dependencies>
                <dependency>
                    <groupId>org.springframework.cloud</groupId>
                    <artifactId>spring-cloud-dependencies</artifactId>
                    <version>${spring-cloud.version}</version>
                    <type>pom</type>
                    <scope>import</scope>
                </dependency>
            </dependencies>
        </dependencyManagement>

        <build>
            <plugins>
                <plugin>
                    <groupId>org.springframework.boot</groupId>
                    <artifactId>spring-boot-maven-plugin</artifactId>
                </plugin>
            </plugins>
        </build>

    </project>
- application.yml或者application.properties配置参数
    security.oauth2.client.client-secret=fbe04a07d39e4fxxxxxxxxx //应用密钥
    security.oauth2.client.client-id=AFCenter/881                //clientId
    security.oauth2.client.client-authentication-scheme=query    //security需要设置query模式,否则调用接口时不去添加secret参数
    security.oauth2.client.grant-type=authorization_code         //代表授权码模式
    security.oauth2.client.user-authorization-uri=http://10.15.15.xxx:13083/api/afc/oauth2/authorize	   //获取授权码接口地址
    security.oauth2.client.access-token-uri=http://10.15.15.xxx:13083/api/afc/oauth2/token           //使用授权码Code获取Access-Token接口地址
    security.oauth2.resource.user-info-uri=http://10.15.15.xxx:13083/api/afc/oauth2/user-info      //使用Access-Token获取用户信息接口地址
    server.port=3048											//应用端口

    server.servlet.session.cookie.name=s2						//设置cookie名称,可以任意设置,也可不设置
- afcenter中的应用管理中,还需要配置回调地址,回调地址配置成 http://ip:port/login (只需要修改ip和端口信息)
- 主要配置类说明
主要涉及3个类的配置,Security配置类,应用启动类,测试接口类
    //Security配置类
    @Configuration
    @EnableOAuth2Sso //启用SSO客户端模式
    public class SecurityConfig extends WebSecurityConfigurerAdapter {
        @Override
        protected void configure(HttpSecurity http) throws Exception {       										      http.authorizeRequests().anyRequest().authenticated().and().csrf().disable();
     //设置所有接口都需要拦截
        }
    }

    //应用启动类
    @SpringBootApplication
    public class Client2Application {

        public static void main(String[] args) {
            SpringApplication.run(Client2Application.class, args);
        }

    }

    //测试接口类
    @RestController
    public class HelloController {
        @GetMapping("/hello")
        public String hello() {
            Authentication authentication = SecurityContextHolder.getContext().getAuthentication();
            return authentication.getName() + Arrays.toString(authentication.getAuthorities().toArray());
            //从凭证中获取username
        }
    }
注意:因为AFCenter提供的是标准RESTFul接口,所以不论后端是什么架构,都可以很方便的实现集成认证中心的功能,基于授权码协议,按照步骤去调用相关接口即可。平台不是只能通过Security组件集成,这里没有提供其他开发框架的对应实现Demo,开发人员在实现时可根据需要确定技术选型。